Essential Installation Guidance for Ensuring Optimal SmartValve™ Performance
Installing a SmartValve™ correctly is crucial to achieving reliable water flow, performance and long-term system reliability.
Whether you’re a professional installer or a technically confident homeowner, following best‑practice guidelines can prevent issues such as airlocking, low flow rates, or even voiding the product warranty.
Below, we break down the key requirements for a successful installation of a pumped SmartValve™ and cold-water storage cistern (CWSC) system.
1. Start with the right Cold Water Storage Cistern (CWSC)
A properly sized cold-water storage cistern is the backbone of a gravity‑fed system.
- The cistern must hold no less than 225 litres (50 gallons).
This ensures sufficient stored water to meet peak demand and helps maintain consistent flow. - The cold water draw‑off point must be positioned on the opposite side of the float-operated valve filling point.
This prevents disturbance in the water level and reduces the risk of air entering the system.
2. Check incoming water supply conditions
To keep the system replenished and functioning correctly:
- The mains supply feeding the cistern must deliver at least 1 bar of pressure.
- The float-operated valve must fill the cistern efficiently and without obstruction.
Restricted or slow filling can impact SmartValve™ performance and may require adjustments or ECO mode activation.
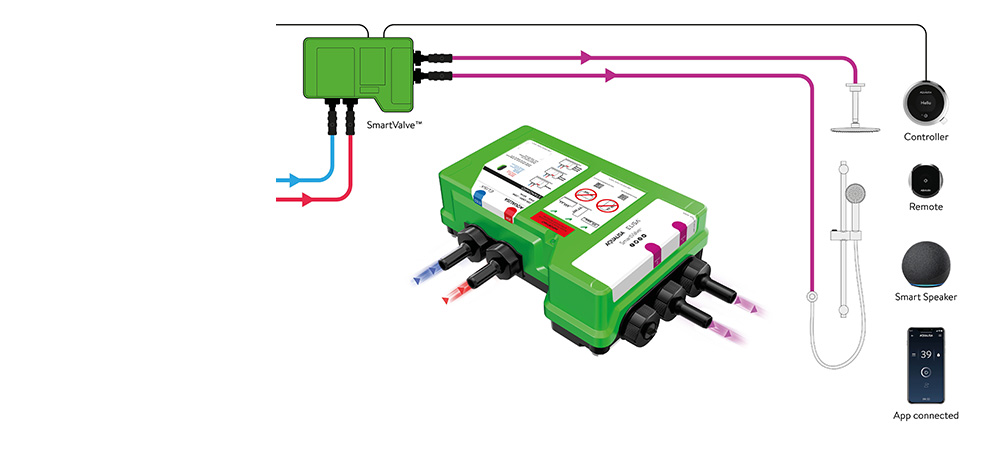
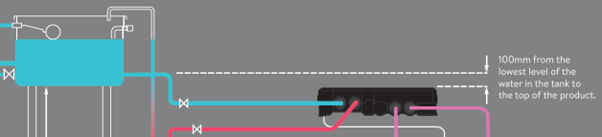
3. Installing the SmartValve™ at the correct height
Correct positioning is essential:
- The top of the SmartValve™ must be located a minimum of 100 mm below the bottom of the CWSC. This helps maintain the necessary static head for proper operation.
- The hot water draw-off MUST be taken from point A or point B as shown in the system diagram.
Incorrect placement can introduce air into the system—one of the main causes of poor flow.
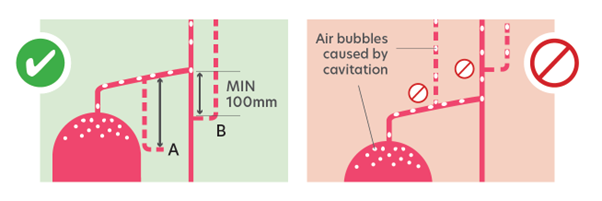
4. Avoid air in the system
Air entering the water supply is one of the leading causes of:
- Poor shower performance
- Low or no water flow
- Airlocking within the SmartValve™
- Potentially invalidating the warranty
Following the installation instructions to the recommended hot and cold draw-off points is essential to prevent these issues.
5. Use the correct pipework
To maintain optimum flow rates:
- Use 22mm pipework on the inlets and reduce to 15mm as close to the SmartValve™ as possible
- Use copper pipe where possible – plastic is fine but copper allows for better flow rates
This reduces pressure loss and supports stable operation.
6. Avoiding shared supplies
Shared pipework can cause fluctuating pressures and unpredictable performance.
Where possible, ensure dedicated supplies are used for the feeds to the SmartValve™.
7. If the cistern refills slowly...
A slow-replenishing CWSC can’t supply enough water during peak use.
If this happens:
- Consider setting the SmartValve™ to ECO mode.
ECO mode regulates performace to match the slower supply rate, helping maintain consistent functionality.
Final thoughts
Installing a SmartValve™ isn’t complicated but accuracy matters. Ensuring correct pipe sizing, cistern placement, draw-off points, and water supply conditions creates a reliable, high‑performing shower that avoids the pitfalls of low flow or airlocking.